Payments
A payment gateway is a service that allows you to accept credit card payments securely online through your store. Create A Shoppe works with many different payment gateways. Create A Shoppe allows money order, cash on delivery, free checkout and more.
Install/Enable Payment Gateways and Methods
- From your admin go to Extensions => Payments (You’ll find extensions in your admin by clicking the gear icon in the far right corner of your screen to open the right side menu.)
- Click Edit to configure each of the payment methods you’d like to use
Editing a payment method
Editing payment methods in the administration for different transaction processors, like Paypal, will require a previously created account. The account and payment information should be obtained from these companies prior to editing the payment method in the administration. You will need to create an account with these companies to use their transaction processing with Create A Shoppe The information required for each payment method will be displayed in the Edit section. Across payment methods, there are a few details that are consistently asked for:
- Order Status: a default status of an order once the payment module has completed. Pending is considered one of the best default statuses because it gives the administrator some leeway to process the order.
- Status: Disables or enables the payment method.
- Sort Order: the position of the payment method in the store front when listed among all the available payment method
Payment method in the checkout
Enabling a payment method in the administration will make it available in the Checkout. During checkout, the customer will be given the option to select their preferred payment method.
Payment method in order history
After the customer has confirmed the order, they can visit their Order History in their Account page to view its status. Immediately after checkout, the status will display the default order status you selected when editing the payment method details.
Setting up Paypal standard
Follow the steps below to start accepting paypal payments
1. Go to Extensions and click Payments in your Admin
2. Click the edit button next to Paypal Standard
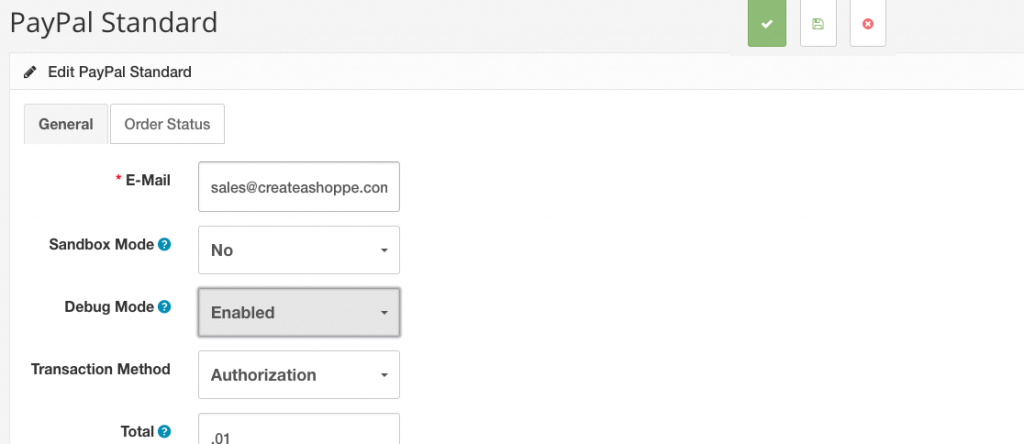
On the General Tab: The EMAIL field at the top of the screen is the only mandatory field.
The following explains each additional option:
Sandbox mode: Allows you to test the payment gateway
Transaction method: This is either an authorization of a payment or the completion of a sale (Paypal can be just a payment authorizer, or also track and process the sale) Sale is the most common selection.
Debug Mode: Provides more text to help troubleshoot issues
Transaction Method: Choose Authorization or Sale
Total : This is total amount that the order must meet before the payment method can be used
Geo Zone: Indicates the zone that this payment method will be active
Status: Indicates if the option is active and available for use
Sort Order: Allows you to determine the order in which payment options will appear for the customer (not applicable if Paypal is your only payment method)
On the Order Status Tab:
Go through each of these options and determine the setting by clicking on each item’s drop down menu.
There are also 10 different order statuses that can be set in the configuration. Each of these order states can be selected as the default selection status of the ten listed order statuses. These definitions depend on the items you allow to be processed in your store (and if they are processed a particular way). For example, it’s possible that you have a failed status and the default order status would be VOIDED. This same process maybe different with other stores, but it depends on how you process these situations.
Here is a quick breakdown of each field:
Canceled Reversal Canceled charge reversal
Completed Completed charge
Denied Charge denied
Expired Expired card- could not be charged
Failed Failed charge
Pending Awaiting processing of charge
Processing Charge in the middle of being processed
Refunded Amount being refunded to customer
Reversed Charge being reversed on order
Voided Charge voided – meaning it no longer exists
Click on the drop-down to select the default status of each order field.
Once you have completed determining the status defaults and the other configuration options in Step 4, click on SAVE in the top right hand corner to complete the process and save your entries.
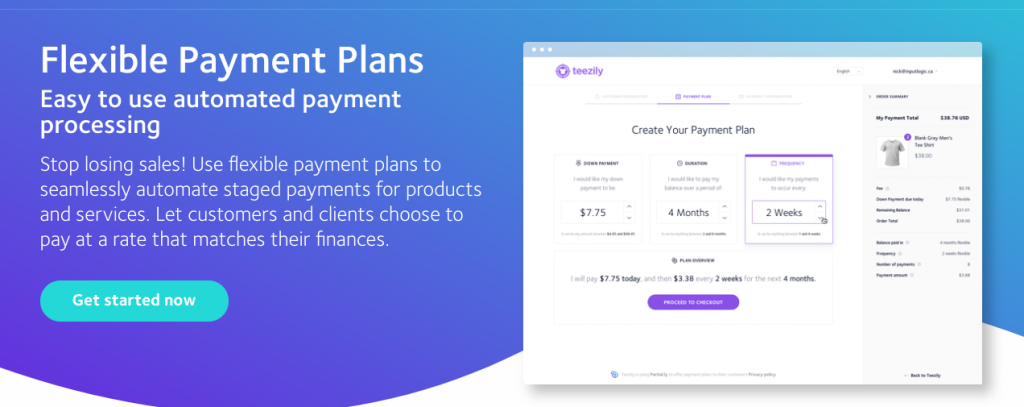
Payment Plans (Buy Now Pay Later w/ Partial.ly)
Stop losing sales! Create A Shoppe works with Partial.ly so that you can offer flexible payment plans to your customers for products and services.
Partial.ly checkout is intuitive and easy to use. Let your customers select the terms that best fit their finances, making it easier for them to repay on time.
Before setting up Partial.ly in your Create A Shoppe Store Admin you’ll need to create an account with Partial.ly. Creating an account is quick and easy. Click here to sign up now!
Follow the steps below to setup Partial.ly to work with your store.
1. Go to Extensions and click Payments in your Admin
2. Click the edit button next to Partial.ly Payment Plans
3. On the General Tab set status to Enabled
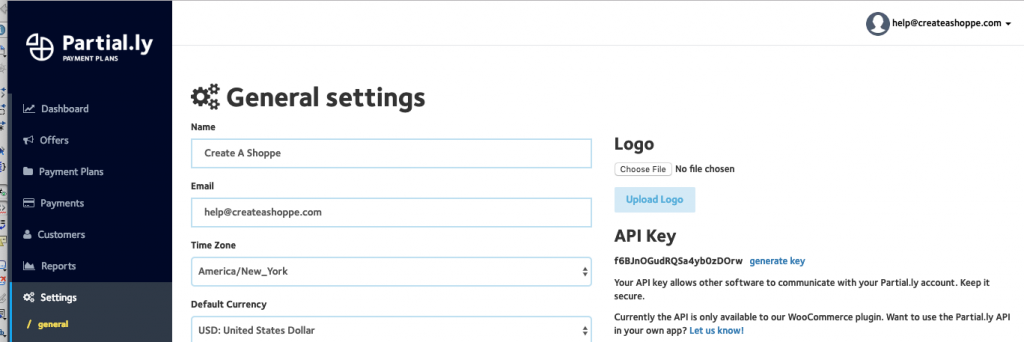
4. Enter your Partial.ly API key (to find your API key login to your Partial.ly account and click on Settings and then General. On the General Settings page you’ll see API Key. If there is a key showing copy it.. if there is no key showing click the Generate Key link and then copy the key that displays after) Go back to your store admin and paste the key.
5. Select an Offer (An offer is a template of terms for a payment plan that you’ve created in your Partial.ly account under Offers. If you have not setup an offer yet.. do so in your Partial.ly account and then return to this area to select it from the drop down)
6. Select the order status you want an order to reach after a customer has paid with Partial.ly. Typically this is the same status you might have for Paypal or other payment methods. If you are selling a service or downloadable it is important to select the same status that you have set for Complete Order Status under System > Settings
7. Set a minimum order amount. This is the total a customer’s cart needs to reach in order for the payment plan to be available.
8. Sort Order is the order you want this payment method to display on checkout. For example if offer Paypal, Stripe and Partial.ly you might set Partial.ly with a sort order of 1 so it displays first and then Paypal as 2 and Stripe as 3. You can leave sort order blank if you have no preference about the order it displays on the checkout page.
9. Save your changes and your store is ready to start accepting payments via Partial.ly
Setting up Stripe
Before setting up Stripe in your Create A Shoppe Store Admin you’ll need to create an account with Stripe. Creating an account is quick and easy. Click here to sign up now!
After you’ve successfully created a Stripe account follow these steps to enable Stripe in your store.
1. Go to Extensions and click Payments in your Admin
2. Click the edit button next to Stripe
Test Secret Api Key: For testing purposes. Leave blank to enable Stripe for live sales. If you need to test see Testing Stripe Payments below.
Test Publishable Api Key: For testing purposes. Leave blank to enable Stripe for live sales. If you need to test see Testing Stripe Payments below.
To find your Api Keys in Stripe click on Developers then Api Keys. Live Api key information is listed in the Standard Keys section.
Live Secret Api Key: Paste the Secret Key provided by Stripe
Live Publishable Api Key: Paste the Publishable Key provided by Stripe
Environment: Set to Live
Order Status: should match the order status you have set under System > Settings > Option Tab
Transaction Method: typically USD
Store Cards: Choose yes or no. (It is not recommended to store cards)
Status: Set status to Yes to enable the Stripe payment gateway
Sort Order: Allows you to determine the order in which payment options will appear for the customer (can leave blank if Stripe is your only payment method)
Save your changes
Testing Stripe Payments
if you are having trouble with your Stripe payment method in checkout is a good idea to test it to see where the problem is.
To find your test Api keys in your Stripe account click on Developers then Api Keys and click the View Test Data toggle. Click the View Test Data toggle again to turn testing off when you are finished to make your account live again.
In your store admin complete these steps.
Test Secret Api Key: Paste the Test Secret Api key. Remove when you are finished testing
Test Publishable Api Key: Paste the Test Publishable Api Key. Remove when you are finished testing
Environment: Set to Test. Change to Live when you are finished testing.
Save your changes.