File Manager
File Manager lets you view and manage all files that power your store. With the file manager you can edit the css and templates that make up any included themes, upload files and photos, edit any file or photo.

To access File Manager click Tools then File Manger in the right menu. If the right menu is not open click the gear icon in the far right corner of your screen to open it.
Edit Photos
All images uploaded to your store for products or info pages are stored within the Image > Catalog folder. You can create new folders within the image > Catalog folder and save photos into those folders too. We’ll assume your photo is in the main Image folder for this tutorial.
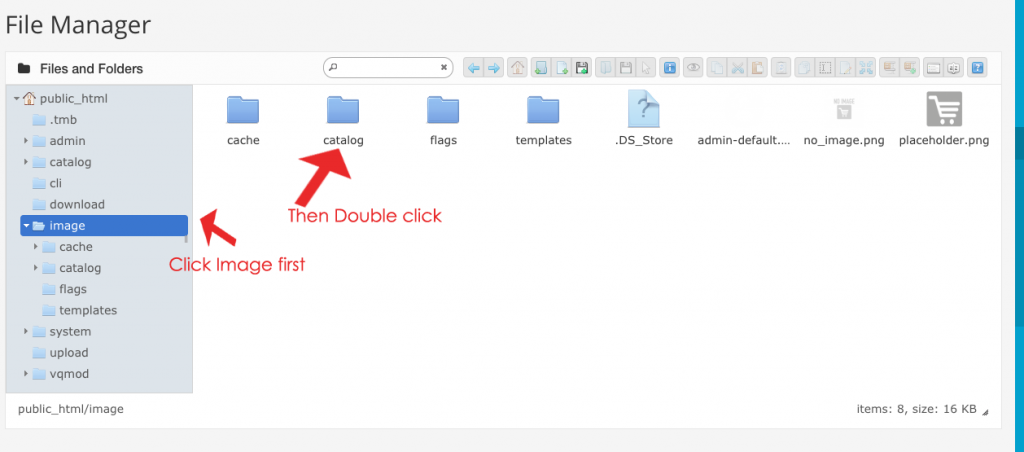
- To access the image > catalog (different from the main catalog folder) folder from File Manager click Image in the left menu. All files and folders located in the Image folder will be displayed in the center of your screen.
- Now double click the Catalog folder in the center of your screen.

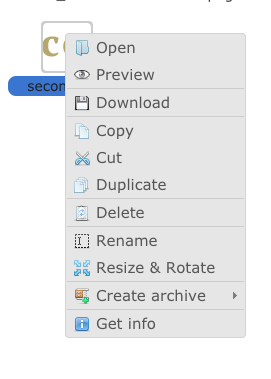
- (Assuming you’ve already uploaded the photo from another area of your admin (info page, product, etc.) Click once on the the photo you would like to edit. Use any tools from the bar just above to make changes to the photo. You can also right click on a photo to bring up a menu with the tools. You can resize, crop, rotate, etc.

Tip: Hover your mouse over any tool when you are in File Manager to see what the tool does

- If you have not already uploaded the photo that you want to work on you can upload in the File Manager too. Click the floppy disk icon with the green +
 in the toolbar to upload a photo from your computer.
Images that do not meet these requirements may cause unexpected behavior or errors.
-Image file names should not contain any spaces or special characters.
-Supported file types are JPEG/JPG, GIF and PNG.
-All images should be under 2mb and for faster loading pages under 1mb
To delete an image right click and choose delete or click ![]()
TIP: Using the copy tool to create a new version of a photo or file before you make changes will save an unedited copy that you can revert back to if needed.
Edit Files
Always use caution when editing files in File Manager. Changes to important code can break your store. If this happens please email help@createashoppe.com and we can restore the file back to the original. Note: Restoring will erase any changes you’ve made a file.
In most cases editing files is not necessary but if you have some CSS or coding knowledge this area gives you access to the code to create a totally unique storefront.
- To edit a file choose the folder on the left and a subfolder in the center if applicable once you see the file that you want to edit in the center of your screen right click on it and choose Edit File from the menu. (some files are not editable for security reasons if the file you choose is not able to be edited Edit File will not appear in the menu. You do have the option to download the file and edit it on your computer and then re-upload it instead.
For a detailed guide on editing the .tpl and .css files to customize a theme see Customizing Pre-Designed Themes
Home Directory
You may be instructed to upload a file into the home directory of your website by another service or website. The home directory is the Public_html folder you see in the left menu in File Manager. (Pinterest, google and other tools may request that you upload a verification file into your home directory. To make sure verification is successful be sure you upload it to the public_html folder)