Filters
Understanding Filters
In a store front-end, you’ll probably find an “Advanced search” feature so that users can filter products according to their preferences. But sometimes, you want to group different kinds of products together, although they belong to different categories. Or you would like to attach a tag to certain products so that they can be found easier in the front-end.
To understand it more clearly, let’s take a real-world example. Let’s assume that you have a “T-Shirts” sub-category available under the “Tops” main category. And you would like to categorize T-Shirts further by “Short Sleeve”, “3/4 Sleeve”, and “Long Sleeve”.
The first option that pops up in your mind is to create another level of categories under “T-Shirts”. But instead of creating another level of categories, which could make things a bit more complex, you can use filters.
The benefit of using filters in the above scenario is that when you enable the “Filter” module, it provides a nice block in the front-end which allows shoppers to refine the relevant products of their choice.
Creating Filter Groups and Filters
Click Store then Filters. Click on the Insert button to open the screen which allows you to create a new filter group and filters. Filter Group Name is the title used to distinguish the filters when more than one set of filters is available for display. Just fill in the details as shown below.
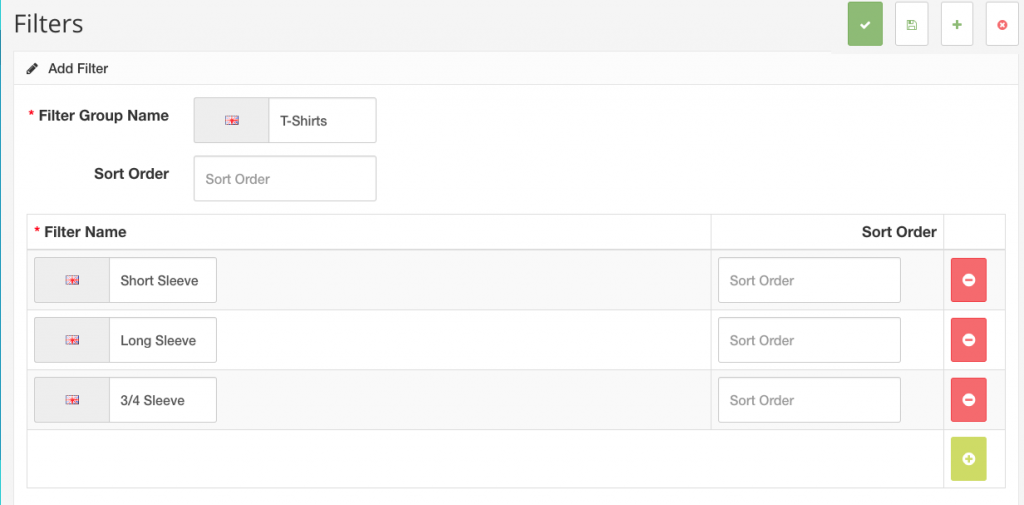
As you can see, we’ve created a filter group “T-Shirts” and the filter values are “Shirt Sleeve”, “Long Sleeve”, and “3/4 Sleeve”.
Click Save button to save the changes.
Assign the Filters to categories and products
Now that we’ve set up the filter group and associated filters we need to assign the filters to the relevant categories and products.
Assign Filters to a Category
Let’s first assign filters to a related category.
Edit the the category. Go to Store > Categories and edit the sub-category under the main category you want to add the filters to. Click on the Data tab. Filters is an autocomplete field. So you can select the values by just typing a few letters.
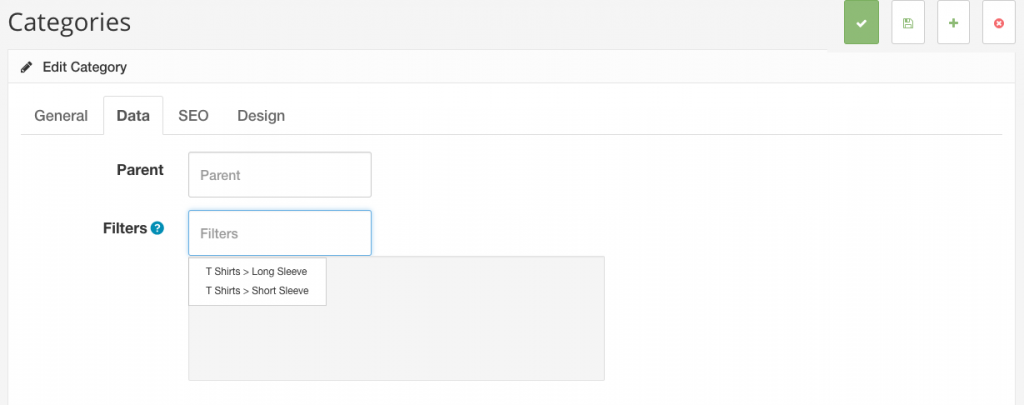
Click on the Save button to apply the changes.
Assign Filters to Products
Now we need to assign filters to the each product that we would like to be filtered by our “T-Shirts” criteria (or what applies to you). Edit the products under the category as we’ve set up the filters for that category in the previous section. Go to Store and click on Products and then click the edit button for the first item you’d like to add the filters to.
Under the Links tab you’ll see the Filter field. Filters is an autocomplete field. So you can select the values by just typing a few letters.

Click on the Save button to apply the changes.
Enable the filter module
We’re almost done with the setup! The only remaining thing is to enable the filter module. If the right menu is not already open click the gear icon in the right corner. Click Extensions then View All. Locate the Filter module by searching Filter or by going through each page of modules. Click the edit button, set to enabled and click Save.
To show this module in the front end of your store so that customers can use it you’ll need to add it in layouts also. Go to Appearance then Layouts choose the page(s) you want to display it on and drag and drop the module to the area of the page you’d like to display repeat for each page and save. For more info on working with layouts see the Layouts section of the manual.