Settings
Click the gear icon in the upper right corner of the admin to open the right menu if it is not already open.
Click System then Settings
The Settings section of your store admin is where you can enter the specific details of your store like location, email, store name, etc. In this area you can also upload your logo, set image sizes and configure other displays settings for your store.
The Settings area is divided into 8 tabs: General, Local, Option, Image Settings, SEO, Blog Security and Maintenance
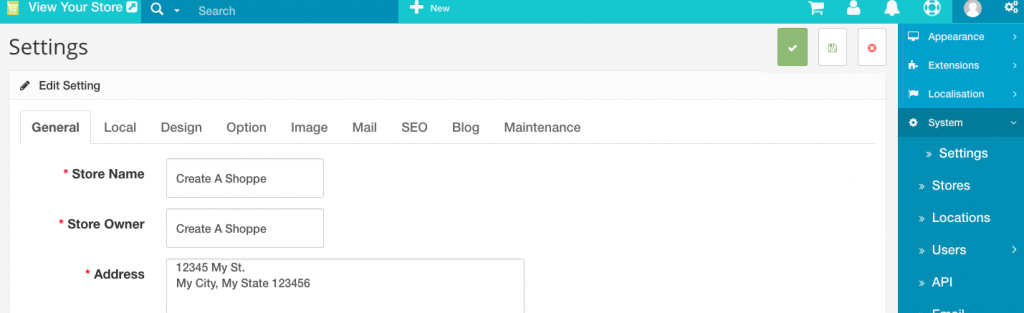
Tab: General
To enter your store name:
- From your store admin, click System then Settings
- On the General tab enter your store name, store owner ( you can enter the store name here also if you do not want to use your name ), address, your email address, phone# and fax# if applicable
Tab: Local
- Click the Local tab
- Choose your Time Zone
- Choose your Country from the drop down list.
- Choose your State/Region
- At this time the only available language and administrative language is English and the system is already set for that.
- Choose your Currency
- Set Auto Update Currency to Yes or No. By default it is set to Yes and and this works for most stores.
- Set a length and weight class for your store to use when calculating shipping.
Tab: Option
The option tab allows you to customize your store with rules and choose display settings.
Click the Option tab
Items
- Default Items Per Page (Catalog): Enter the number of Products you would like to display on each page of your store.
- Default Items Per Page (Admin): Enter the number of Orders, Customers, etc. shown per page in your store admin.
Products
- Category Product Count: Choose yes to display the number of products (product count) listed under a category in your store. Set to no to hide this number so customers do not see it.
- Default Items Per Page (Catalog): Enter the number of Products you would like to display on each page of your store.
- Default Items Per Page (Admin): Enter the number of Orders, Customers, etc. shown per page in your store admin.
- List description limit: Enter a character limit for short descriptions on categories
Reviews
- If you would like to allow Reviews choose yes.
- If you would like to allow guests to submit Reviews choose yes.
- If you would like to receive an email when a new review is made choose yes or no
Vouchers
(gift certificates)
- Voucher Min: Set the smallest amount a voucher or gift certificate can be purchased for. (Example: 10 =$10 Do not enter the dollar sign)
- Voucher Max: Set the largest amount a voucher or gift certificate can be purchased for. (Example: 1000 =$1000 Do not enter the dollar sign)
Taxes
- If you would like your prices to display with tax in your store choose yes otherwise set to no and tax will only be displayed in the shopping cart.
- Choose if you would like to base taxes off of the customers shipping or the store address
Account
- If you would like to view customers online in your store while you are in your store admin choose Yes.
- Customers Activity: Set to yes to leearn what customers are doing while they are visiting your store. Product viewed, pages visited, time spent.
- Set Customer searches to Yes if you would like to track what searched in your store
- In some cases a store might have different Customer Groups. For example you might have Retail and Wholesale customers. Choose which group you would like to make the default group. (for most this will fine to set at default)
- Login display prices: If you do not want your product prices to show until a customer is logged in (great for wholesale stores) set to Yes, otherwise leave set to No
- Max login attempts before the account is locked for an hour for security. 5 is a good settings.
- Account Terms: to force customers to agree to terms or conditions before creating an account choose the page (use an existing page or add a new page under Store>information pages) from the drop down that has your terms or conditions. If you do not wish to force a customer to agree to any terms or conditions choose —None—
- Set New account alert email to yes if you would like to receive an email each time someone creates an account.
Checkout
- To display the total weight of items in a customer’s cart at the top of the shopping cart page set Display Weight on Cart Page to Yes otherwise set to No.
- Guest Checkout: Choose yes to allow customers to checkout without creating an account. If the customer has a downloadable item in their cart this option will not be available
- Checkout Terms: to force customers to agree to terms or conditions before checking out choose the page (use an existing page or add a new page under Store>information pages) from the drop down that has your terms or conditions. If you do not wish to force a customer to agree to any terms or conditions choose —None—
- Invoice Prefix: Set the invoice prefix (e.g. INV-2011-00). Invoice ID’s will start at 1 for each unique prefix
- Order Status: Choose status from the drop down that you would like applied to new orders. (Pending or processing are most common.)
- Complete Order Status: Choose the status a customer’s order has to reach before they can access a downloadable product or a gift voucher. (Complete is most common)
Stock
- Display Stock: If you would like the customer to see how many of an item you have available for sale choose Yes otherwise set to no.
- Show Out Of Stock Warning: Set to yes if you want to display an Out of Stock message on the shopping cart page if a product is out of stock and you’ve set Stock Checkout in the next step to Yes. (If Stock checkout is No always set Out of Stock Warning to yes)
- Stock Checkout: Choose yes to allow customers to still checkout if the products they are ordering are not in stock. Set to no if you want to prevent them from checking out if out of stock items are in their cart.
- Out of Stock Email: Set to yes if you would like an email when something is out of stock
Affiliates
- Affiliates Activity to yes if you want to learn about their activity.
- Select if you want to approve affiliate accounts before they are active
- Select if you want Automatic commissions
- Affiliate Commission (%): Enter the amount affiliates will be paid. Example: 10 =10% (do not enter the % sign)
- Affiliate Terms: If you plan to use the affiliate feature for your store you can select a page to serve as the Affiliate terms. (choose an existing page or one you created under Store>Information pages) or set to None if you will not be using the affiliate feature or if you do not need affiliates to agree to terms.
- Affiliate Alert Email: set to yes if you would like an email when a new affiliate signs up
Returns
- Return Terms: Choose a page to serve as the terms for returns (choose an existing page or one you created under Store>Information Pages) or set to —None—
- Return Status: Choose a status to be applied automatically when a return request is submitted. (pending is a common choice)
- New Return Request Email: set to yes if you would like an email about new return requests
Tab: Image Settings
Click the Image Settings tab to upload your own Logo, a Favicon and set your preferred sizes for product images
- Store Logo: Click browse to locate the logo on your computer and upload to your store. Once your logo is uploaded and you’ve saved your changes your logo will appear on your website in the place it is preprogrammed in your theme. In some cases you may need to resize your logo on your computer and upload it again if it does not fit correctly the first time you load it with the template you are using.
- Icon: Click browse to locate your favicon on your computer and upload it to your store. A favicon is the small image you see next a website’s name in the browser tab at the top of your browser screen. (see small shopping cart icon in example image)

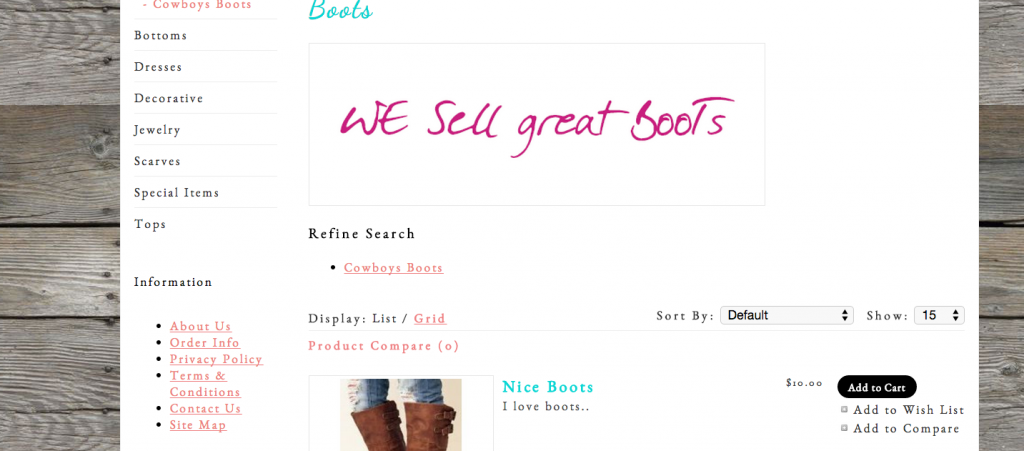
- Category Image: Category image controls the size of the the photo you upload when you are editing or creating a new category (under the data tab for that category). This is the image(s) that show just below your category title on your category pages. See “We sell great boots” example below.
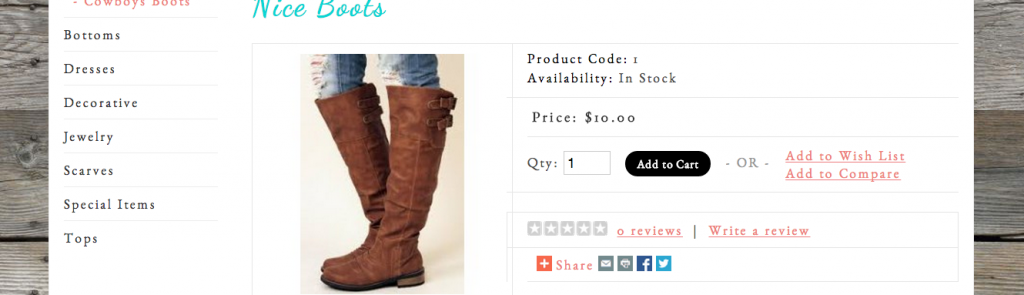
- Product Image Thumb Size: controls the size of your product picture beside the product info as seen below.
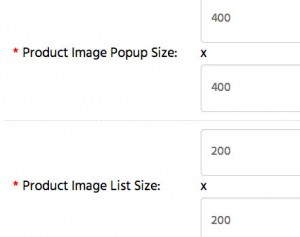
- Product Image Popup Size: controls the size of the image when you click the “Product Image Thumb” to view it larger (this will also control the size of the image when you mouse over the “Product Image thumb” if your template uses the zoom feature)
- Product Image List Size: controls the size of the product photos displayed on a category page in list or grid view.
- Additional Product Image Size: controls the size of the any additional product photos you’ve added under the Image tab when you are creating or editing a product.
- Related Product Image Size: If you’ve set related products this will control the size of the photos that show on the product pages of your store
- Compare Image Size: controls the size of the images displayed when products are compared in your store
- Wish List Image Size: controls the size of the product photos a customer adds the item to their wishlist
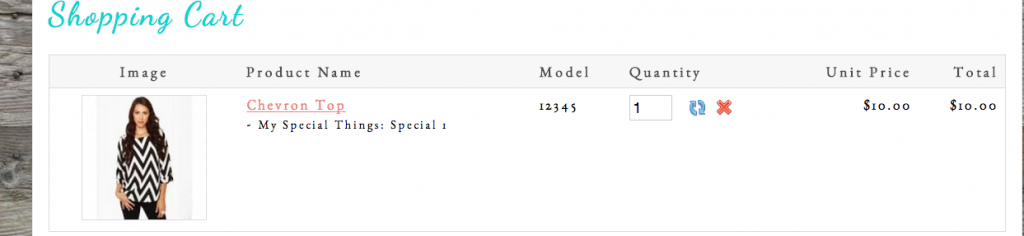
- Cart Image Size: controls the size of the product photos of items in the shopping cart
Tab: SEO
Select the SEO tab and you will have the following options for editing:
Metadata
- Meta Tag Title This should be your store name along with a short description of your store. For example we use: Sell your products or services online with Create A Shoppe’s store builder as our title.
- Add to other Titles Enter something here if you want other pages to show a different title
- Meta tag Description A meta description is the bit of text that shows up on a searches like Google after your title tag. The meta description can be set for your homepage as well as other pages, collections, and blog posts. It’s good practice to for each page to have a different meta description. Describe your store in plain, direct language. A good description will encourage more people to click links to your store.
- Meta Tag Keywords Keywords are the terms that used to search for things on the web. If you sell t-shirts than you keywords might similar to: t-shirts, funny tees, graphic t-shirts, etc.
- Meta Google Key Enter your Google Site Verification Key provided by Google to verify your site.
Sitemap
Create A Shoppe generates several sitemaps for you. If you need the links/URLS for those sitemap pages for any reason you can find them listed in this area. Sitemaps are automatically updated anytime you make changes to your store or products.
Tab: Blog
- Give your blog a name
- Enter a description about your blog
- Choose if you would like a feature slide of your posts displayed on your blog
- Fill in meta tag information
- All remaining settings are according to how you would like your blog setup
Tab: Security
The uploads section has already be configured for you. You do not need to make any changes to this section
CAPTCHA
If you are getting a lot of spam from your contact form enabling captcha can stops bots from abusing the form and slow or prevent spam completely. Choose Basic from the drop down and save your changes to enable Captcha.
Tab: Maintenance
On occasion you may need to take your store down temporarily. You can do this easily any time in your admin.
- Set Site offline to yes to put your store in maintenance mode. Set no to open your store up again.
- Enter a short message (optional)
- Upload a logo or other photo to display on the page (optional)
Be sure to save your changes