Multi-Stores
Create A Shoppe allows you to create and manage an unlimited number of stores from one admin interface for no extra cost.
There are many advantages to being able to set up multiple stores:
- Theme each store differently
- Set products to appear only on specific stores
- Localize each store by setting different taxes and shipping
- You can set different prices for each store
- Setup a default customer group for each store allowing you to have some stores setup for retail customers and others as wholesale.
How to set up and manage multiple stores
First point the nameservers for your new store’s domain to: ns1.createashoppeplus.com & ns2.createashoppeplus.com then complete the steps below. Nameservers are managed in your account where you paid for and registered your domain. If you registered your domain through Create A Shoppe your nameservers are already set for you.
Add a new store
- First you’ll need to create a subdomain in your hosting control Panel. Login to the cPanel and look for a button called “Addon Domain”. (cpanel login information is in your welcome email. If you need your cpanel info again please email help@createashoppe.com)
-
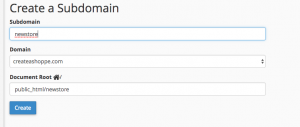
On the “Create a Subdomain” page you need to specify:
- Subdomain – here you need to enter a name (your new store name can be used)
- Choose your newly added domain from the dropdown
- The document root should be public_html.
-
Click “Add Domain”. If all the fields were filled in correctly, here you are going to see a notification of successful domain creation.
4. To make the new store visible at the new subdomain you just added, you will need to add the new store in your store admin as well. Go back to the admin of your Create A Shoppe store. Go to the menu System and click Store and click the green + button in the upper right corner of your screen to Add New.
5. Now you can proceed to filling information from the other tabs: General, Local, Design, Option, Image, SEO, Security and Server. In these sections you can choose a theme, add a logo, currency, language, layout, etc.
6. Click “Save” when you are done.
Products, product categories, customers, page layouts, and more, can be edited in the admin and customized for each store. You can individually select which products are available for each store in the Links tab when editing or creating a product. Checking the stores in this section makes the product only available in those specific stores. When adding or modifying a product category, you can select which stores display the category in the Data tab. Customer and order info will be automatically sorted into their appropriate store in the administration side when they create an account or buy a product at that store.